Wednesday, July 09, 2014

VNC Address Book - Window Invisible? Working as intended?


VNC Address Book - Window Invisible? Working as intended?


I have VNC Server and VNC Viewer on the same PC with Windows 7 Ultimate x64.
Is VNC Address Book supposed to have a main application window? I can't tell if this is bugged or working as intended.
When I start VNC Address book, it creates an item in the task list and also an icon in the notification area. If I click the task list item once, nothing happens. If I click again, it disappears from the task list but remains in the notification area**. If I right-click the icon on the notification area, there is an option 'open address book', which if chosen, creates the item in the task list again, with the exact same behavior.
If I left or right click on the address book icon, I have ways to connect to servers in the address book. However I have no way to add/remove/edit servers in the address book.
**Note that this behavior is identical to that of an application with a main window where there is an option to 'minimize to system tray / notification area'. Only here, no main window is visible, ever.
If fixing this problem is beyond the scope of this site, that's fine, but at this point I have no real way to tell if the program is malfunctioning on my pc or if it is far more minimalist than I expected.
There appears to be no forum on realvnc.com where I can ask about this, perhaps this is to prevent me from getting any help unless I pay to register?

Follow the Steps as stated below  to fix the issue ..

  1. In Windows Registy navigate to the following location:
    HKEY_CURRENT_USER\Software\RealVNC\VNC Address Book
    
  2. Find the key named geometry and clear its value.
  3. Start VNC address book and the window should appear.

Thursday, May 08, 2014

Notepad++ plugin for viewing JSON data

Notepad++ plugin for viewing JSON data and other benefits


Q. Why is Notepad++ is a very handy tool?
A.  Notepad++ is a very handy developer tool. Here are some of the productivity benefits of Notepad++.

 to view source code as a free and light weight source code editor that runs in Windows environment. You can also use it to view log files and other text data.
It can be used for syntax highlighting, line numbering, search and replace with or without regular expressions, modified file detection, file search, etc.

Working with JSON data

Recently, I had to work a lot with JSON data, and stumbled across a very handy plugin for Notepadd++ called "JSONViewer Notepad++", which allows you to format JSON data and view them as a tree structure. Here are the simple setps to install this plugin.

Step 1: Download the plugin as a zip file from the source-forge site.

Step 2: Unzip the downloaded file and extract out the "NPPJSONViewer.dll" file.

Step 3: Copy this file to the plugins folder in your Notepad++ installation folder, and restart your Notepad++. for example "c:\myapps\Notepad++\5.9\plugins".

Step 4: When you open up your Notepad++, you will see the "JSONViewer" sub menu under the "Plugins" on the top main menu. You can format the JSON text by highlighting your text first and then clicking on Plugins --> JSON Viewer --> Format JSON.

Friday, April 18, 2014

6 Amazing Advances in Cloud Technology


           6 Amazing Advances in Cloud Technology

The cloud is more than just dirt-cheap data storage and lightning-fast apps. These six innovations show that it's possible to manage servers, develop applications, run virtual machines and even sequence the human genome using cloud technology.


1. Genetic Sequencing

Using powerful supercomputers to help with cancer research isn't exactly new — but moving the scientific calculations to the cloud marks a major undertaking. Analyst Charles King says this is a significant project in two major ways: One, it's try to understand the genomic sequencing that occurs in brain cancer patients, and two, it's showing how the cloud is maturing. The cloud-based version of IBM Watson can scan databases and learn how to customize treatments to patient DNA.

2. Microsoft Office 365 for iPad

Microsoft Word for iPad

This advancement might not seem that world-changing, although it's surprising that Microsoft has finally launched Office apps on the Apple iPad. What is game-changing for business users: The apps sync securely to the cloud. The apps are also free for business users who've already standardized on Office 365 and pay the monthly Web usage storage fees. Importantly, the apps were designed for tablet use, meaning they support swiping and other gestures.

3. Basic6

Using a console to manage cloud servers and data center services in one view lets you accomplish tasks such as managing accounts, setting passwords and controlling Amazon Elastic Compute Cloud (EC2) features.
The main innovation with Basic6, though, is that the dashboard works in real-time for services such as Box and AWS at the same time. Most features are managed using a tree structure on the left pane. The console maintains an audit trail of exactly which changes were made to which cloud services.

4. Box View

Writing code for the cloud might be about as dull as a routine health exam, but Box is making it as easy as possible. One innovation, Box View, essentially gives even nonprogrammers a way to upload a business document and create rich HTML sites with an embedded document viewer. It's also a sign of things to come — that is, the cloud will continue to evolve in terms of developing custom apps and features that match business needs.

5. Amazon WorkSpaces

Offering a virtual desktop to employees has always presented one great IT challenge: Making sure the desktop is always available and tuned for speedy performance. Amazon recently started offering WorkSpaces, a cloud-based desktop that runs on laptops and tablets.
The main innovation of Amazon WorkSpaces concerns network optimization using Amazon Web Services; this provides the same kind of availability you've come to expect from a cloud storage service or custom application.

6.SmartVue

Video surveillance in a corporate setting is a different beast from home surveillance; there are likely policies about encrypting the signal, storing the recorded video and managing the cameras, among other things. The Smartvue cloud surveillance servers lets you view and manage cameras from a Web browser. Security cameras installed on premises can link to the cloud server for policy management, storage and security controls — and many third-party cameras will work just fine.

Thursday, April 17, 2014

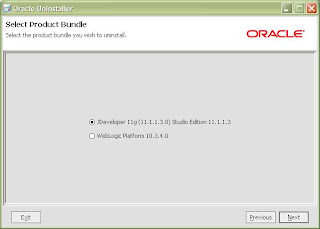
How to uninstall Jdeveloper 11g

How to uninstall Jdeveloper 11g

  • Go to the Oracle_home\utils\uninstall folder.
  • Click on uninstall.exe
  • Follow the screens than

Thursday, April 03, 2014

Remove “Installed by Enterprise Policy” Google Chrome extension

Remove “Installed by Enterprise Policy” Google Chrome extension

Notice: All software and tips we supply are free from any charge.

By  | February 10, 2014
Installed by Enterprise policy Google ChromeGoogle Chrome extensions are often very easy to remove, if you goto the extensions tab search for your specific extensions and click the trash can icon the extension is gone forever. But in some cases the extension is “Installed by Enterprise Policy” and cannot be removed using the trash can icon. In that case we need to manually remove the extensions from Windows and Google Chrome. This is some work but not a very hard task to perform. The extensions “Installed by Enterprise Policy” are mostly caused by adware, in our removal guide for “Installed by Enterprise Policy” extensions we use the extension YouTubeAdBlocker as a example. In your case this extension might have different name, but it all works the same way.

Remove “Installed by Enterprise Policy” Google Chrome extension

This instruction works! (Cause we tested it!)

First we need to remove malicious software from your computer. In some cases this might also remove the by Enterprise installed policy from Google Chrome. It’s the easiest and quickest way to get rid of this extension. The main problem is, there is a lot of adware spreading of the internet and we can’t say which adware is installed on your computer. If you have a extension “YoutubeAdBlocker” search for “YoutubeAdBlocker” in the programs list, if you have any other adware search for that specific name. Bottom-lineremove any software you don’t know, trust or is recently installed.

STEP 1 – Remove Malicious software from Windows XP or Windows 7

  • Select Start
  • Select Control Panel
  • Goto Programs
  • Select Uninstall a program
Installed by Enterprise policy Google Chrome

Search for {MALICIOUS SOFTWARE} and click the Uninstall button

Basically search for any recent installed software you don’t know or trust
Installed by Enterprise policy Google Chrome

Remove Malicious software from Windows 8

Drag your mouse to the right edge of the screen. Goto Search and type “Control Panel
Select Control Panel on the left.
Installed by Enterprise policy Google Chrome
Goto Programs – Uninstall a program
Installed by Enterprise policy Google Chrome

Search for {MALICIOUS SOFTWARE} and click the Uninstall button

Basically search for any recent installed software you don’t know or trust
Installed by Enterprise policy Google Chrome

STEP 2 – Find ID of Google Chrome Extension and remove it

  • Open Google Chrome
  • Goto Menu (3 strips in the right corner) > Settings > Extensions
Installed by Enterprise policy Google Chrome
  • Select “Developer Mode” and NOTE or COPY the id of the extension that is “Installed by Enterprise Policy”.In our case: YouTubeAdBlocker, yours might have a different name.
Installed by Enterprise policy Google Chrome
  • Close Google Chrome
  • Windows XP/7/Vista: Goto Start > type: regedit.exe
  • Windows 8: Drag your mouse to the right edge of the screen. Goto Search and type “regedit
    Select Regedit on the left.
Installed by Enterprise policy Google Chrome
  • In the registry editor hit (ctrl+F3) or goto Edit > Find Next
  • In the Search-box enter the ID of the ID we found earlier in the Google Chrome managed extension.
Installed by Enterprise policy Google Chrome
  • Press Find Next
  • The key is found in HKEY_LOCAL_MACHINE\SOFTWARE\Policies\Google\Chrome\ExtensionInstallForcelist
  • Delete the key, right click on the number and select “Delete
Installed by Enterprise policy Google Chrome
  • Open Google Chrome
  • Navigate to: chrome://policy/
  • Search for the directory of the files from this Google Chrome extension that is “Installed by Enterprise Policy”. This directory is a example, yours might be different.
Installed by Enterprise policy Google Chrome
  • Open Windows Explorer
  • Click Organize > Folder and Search Options
Installed by Enterprise policy Google Chrome
  • Goto tab: View
  • Check Show Hidden Files, Folders and drives
  • Click Apply button
Installed by Enterprise policy Google Chrome
  • Navigate to the directory we found earlier in the chrome://policy/ tab.
  • Delete the entire folder
Installed by Enterprise policy Google Chrome
Example: your directory might be different!
  • Policy Managed extension’s files are stored in Google Chrome’s default extensions folder . You need to delete the directory corresponding to the noted ID we did earlier.
Windows XP: %USERPROFILE%\Local Settings\Application Data\Google\Chrome\User Data\Default\Extensions
Windows 7/8 or Vista:
 %LOCALAPPDATA%\Google\Chrome\User Data\Default\Extensions
  • Delete the folder with the ID we found earlier in Google Chrome Extensions.
Installed by Enterprise policy Google Chrome
Notice: your ID might be different then the one used in the example.
  • Navigate to : %windir%\system32\GroupPolicy\ folder (e.g. C:\windows\system32\GroupPolicy)
  • Delete the folders Machine and User
Installed by Enterprise policy Google Chrome

THIS IS IT! ENJOY!

Installed by Enterprise Policy’s are completely gone for Google Chrome.

Tuesday, March 18, 2014

CHECKIN FOLDERS AND FILES IN A DIRECTORY RECURSIVELY IN ORACLE ADE

 CHECKIN FOLDERS AND FILES IN A DIRECTORY RECURSIVELY IN ORACLE ADE


This script will do the following:

1) ade mkdir all directories recursively
2) ade mkelem all files recursively
3) copy the contents of files in reference folder to the create files in ade view


Steps to execute it:

1) Create an ade view based on a label

2) Use view=> ade Use view

3) Set the variable 'ref' to the reference root folder with full location
    
Eg. setenv ref /scratch/cthiyaga/temp/ROOT

* Do cp2local of all files and dirs under $ref if needed


4) Create the new folder "ROOT"  in appropriate ade location  and Set the variable 'cur' to the new folder  with full ade location
Eg. Suppose you want create the new folder "ROOT" in location in the location "/scratch/cthiyaga/view_storage/cthiyaga_case_view/bpm"
Then=>

ade mkdir /scratch/cthiyaga/view_storage/cthiyaga_view/bpm/ROOT
setenv cur /scratch/cthiyaga/view_storage/cthiyaga_view/bpm/ROOT

5)  copy the attached file in some location and run perl checkinAdeDirRecurse.pl 


After the script execution , you can check the files and then continue with check in and merge of the the files as usual process.

Perl Script to be used. checkinAdeDirRecurse.pl 

 #!/usr/local/bin/perl

# set the env variables $ref and $cur 
# set $cur to new Ade dir
# set $ref to dir from where u want to copy
# Do cp2local of all files and dirs under $ref if needed

$f_FilesList="/tmp/files.log";
$f_Dirslist="/tmp/dirs.log";
#$ref="/scratch/cthiyaga/CaseMgmt/EURentdemo/EURent";
#$cur="/scratch/cthiyaga/view_storage/cthiyaga_casemgt_ps6_auto_view/bpm/qa/bpmr2tests/oracle/casemanagement/samples/EURent";
$ref=$ENV{'ref'}; 
$cur=$ENV{'cur'}; 
print "ref is $ref\n cur is $cur";
chdir $ref;
system("find . -type d | tee  $f_Dirslist");
system("find . -type f | tee  $f_FilesList");
system  ("ade mkdir $cur");
chdir $cur;
open(FH, "< $f_Dirslist");
@contents=;
close(FH);

chdir $cur;
foreach $line(@contents) {
chomp $line;
if($line ne '.'){
system  ("ade mkdir $line");
#print "ade mkdir $line\n";
}
}

open(FH, "< $f_FilesList");
@contents=;
close(FH);

chdir $cur;
foreach $line(@contents) {
        chomp $line;
        system  ("ade mkelem $line -nc");
system ("cp $ref/$line $cur/$line");
#print "ade mkelem $line \n";
#print "cp $ref/$line $cur/$line\n";
}

Note:
To undo check-in execute below commands

ade unmkelem -all
ade unco -all
ade cleanview


Thursday, February 20, 2014

ADF LOGGER


ADF LOGGER


Oracle has provided a logging mechanism in ADF, so that a developer can use this logging feature to test the ADF applications. It's basically a thin wrapper around the java.util.Logging APIs with a few simple methods and, most importantly some specific features integrated into both JDeveloper and Enterprise Manager. It's preferable to use this built-in logger for these reasons, plus it can help you avoid the kind of class-loading issues if one uses some random version of something like Log4J.
Oracle Fusion Middleware components create diagnostic log files in the Oracle Diagnostic Logging (ODL) format. Log file naming and the format of the contents of log files conform to an Oracle standard. By default, the diagnostic messages are in text format.
You can also set up the Java logger to display Java diagnostic messages. Whichever logging format you choose, you can set several levels of logging to control the level and number of messages that are displayed.
You configure the logging session by editing the logging.xml file using the overview editor for Oracle Diagnostic Logging Configuration. You can set the logging level for both persistent and transient loggers and declare handlers for each logger. Logging configuration can be set at any time, even while the application is running in JDeveloper.

After you have created a log, you can view and filter the log messages with the Oracle Diagnostic Log Analyzer. This tool allows you to set filters for different log levels, define message time frames, and search on message text.

Configuration Steps :

Open logging.xml file :


  • In the Application Server Navigator, right-click IntegratedWebLogicServer and choose Configure Oracle Diagnostic Logging for server name.


  • Or, from the Log window Action menu, select Configure Oracle Diagnostic Logging.


  • In the overview editor, click the Overview tab, select ODL Log Levels or Java Log Levels for the logger types you want to view.


  • So what we see here is a hierarchy of all the packages in the running app server. Notice that some of the icons are green, these are packages or classes that have a presence in the logging.xml already and some are yellow. These latter groups are transient, that is, we can temporarily set up logging on that package or class for the duration of the application server, but once the application server shuts down, the entire logging configuration will be reverted. You'll notice the checkbox at the top of this screen that is labeled Hide Transient Loggers if you want to see persistent loggers only, select Hide Transient Loggers.

Setting up logging level: 

  • You can use the overview editor for Oracle Diagnostic Logging Configuration to configure the logging levels specified in the logging.xml file. The file can be configured before and while the application is running in Integrated WebLogic Server. The changes will apply without the need to restart the server.
  • When Integrated WebLogic Server is running, you can define both persistent and transient loggers. When the Integrated WebLogic Server is not running, you only can define persistent loggers. The transient loggers will last only for the session and will not be entered in logging.xml. If the server is not running, you must explicitly save the configuration changes to logging.xml for the updates to take effect in the next server run.


  • To set level of a package or class just expand the corresponding package or class, go to the level column drop down the list and select the required level.
  •  Now this class or package will show this level of message. If a package has a level set then all the sub package and classes under that package will show the same level of messages.

Add new logger :
  • To add a logger.
  1. If the server is running, click the add icon dropdown menu, and choose add persistent logger or add transient logger . If the server is not running, click Add to add a persistent logger. You cannot add a transient logger.
  2. In the Add Logger dialog, enter a logger name.
  3. Select the logging level.
  4. Click OK.
  • As well as the logging levels it is also possible to configure the handlers. In logging, the handler is the thing that takes your log message and does something with it - prints it to the console, writes it to a file etc. If you select the root logger in the editor here you will see that it defines three handlers listed in the Handler Declaration section of the screen at the bottom of the editor:
    • odl-handler
    • wls-domain
    • console
  • The first two would be the default for a standalone WLS instance, but the console we've automatically added for you in the case of the embedded WLS so that you will be able to see the output of your carefully placed logging commands in the log window of the IDE.
Logging.xml file

These changes are done from JDeveloper IDE in logging,xml file, which resides in following location:

C:\Documents and Settings\username\ApplicationData\JDeveloper\latest_system_ folder\DefaultDomain\config\fmwconfig\servers\DefaultServer


These customizations in xml file looks like :


Use of ADF Logger


  • Using logger for model configuration :
  1. In the Application Navigator, double-click the user interface project.
  2. In the Project Properties dialog, click the Run/Debug/Profile node and create a new run configuration.
  3. In the Run Configurations list, double-click the new run configuration to edit its properties.
  4. In the Edit Run Configuration dialog, for Launch Settings, enter the following Java options for the default virtual machine: 
  5. -Djbo.debugoutput=adflogger
  6. This option will now pick the settings from logging.xml file.

  • Using Logger for java classes
    • First define the logger itself - usually a static variable in a particular class - for example one of your managed beans:
    1
    2
    private static ADFLogger _logger =
                ADFLogger.createADFLogger(MainPageBackingBean.class);
    • • Next, throughout your code you can sprinkle logging statements at various levels which are (I hope) fairly self explanitory, for example in this constructor:
    1
    2
    3
    4
    5
    6
    7
    8
    9
    10
    11
    12
    13
    14
    15
    16
    public MainPageBackingBean() {
            super();
            _logger.info("Creating a new instance");
            if (BindingContext.getCurrent() == null) {
                _logger.warning("Injected Data-Binding Reference is null");
            } else {
                try {
                    doSomethingComplex();
                } catch
                weirdAppException waex;
                {
                    _logger.severe("Unexpected exception doing complex thing",
                                   waex);
                }
            }
        }
    • As you can see we generally just pass a String message to the logger, although in the error case we can pass a throwable exception as well. You can also grab your Strings from a resource bundle, rather than hardcoding them. This probably makes sense for error messages but may be overkill for programmers eyes only messages. To grab the resource bundle you simply call the getFormattedMessage() function on the logger, or you can also get hold of the resource bundle that it references using getResourceBundle().
    1
    _logger.severe(_logger.getFormattedMessage("errors.db_connection"));
    • Where the resource bundle contains something like:
    1
    errors.db_connection=Unable to establish connection with database!
    • You can pass parameters to inject into the resource string as well
    • The final thing to mention in this posting was the use of guard conditions. Although logging calls themselves are cheap if logging is not enabled, you may actually need to do quite a lot of work to prepare the stuff you want to log. For example, I have a standardized method that I use as a Task Flow Initializer to dump out the contents of the PageFlowScope for that taskflow. That's a pretty expensive operation so you want to bypass that whole thing if you know that every single log message within it will be ignored.
    • Therefore you can use the isLoggable() method to wrap the whole thing. Here's the example:
    1
    2
    3
    4
    5
    6
    7
    8
    9
    10
    11
    12
    13
    14
    15
    16
    17
    18
    19
    20
    21
    22
    23
    24
    25
    26
    27
    28
    29
    30
    31
    32
    public void diagnosticInitializer() {
            //Only do the work if we need to
            if (_logger.isLoggable(Level.INFO)) {
                AdfFacesContext actx = AdfFacesContext.getCurrentInstance();
                FacesContext fctx = FacesContext.getCurrentInstance();
                //Gather key information to dump
                String windowName =  actx.getWindowIdProvider().getCurrentWindowId(fctx);
                String viewPort = ControllerState.getInstance().getCurrentViewPort().getClientId();
                Map pageflowScopeMap = actx.getPageFlowScope();
     
                _logger.info("TaskFlow Diagnostics for " + viewPort);
     
                if (!pageflowScopeMap.isEmpty()) {
                    Iterator mapIter = pageflowScopeMap.entrySet().iterator();
                    while (mapIter.hasNext()) {
                        Map.Entry entry = (Map.Entry)mapIter.next();
                        String varKey = entry.getKey().toString();
                        Object varValue = entry.getValue();
                        String varClass = "n/a";
                        if (varValue != null){
                            varClass = varValue.getClass().getName();
                        }
                        StringBuilder bldr = new StringBuilder();
                        Formatter formatter = new Formatter(bldr, Locale.US);
                        formatter.format("Key:\"%s\" Value:\"%s\" Type:[%s]", varKey, varValue, varClass);                   
                        _logger.info(bldr.toString());
                    }
                } else {
                    _logger.info("No PageFlowScope associated with this TaskFlow instance");
                }
            }
        }

Popular Posts